
Setup Guide for an
on-premise license server
for VDC Manager
rev. 2025-06-14
Thinkproject's VDC Manager (formerly DESITE BIM) uses a Flexera licensing system (from version 2.6.0 onwards).
This guide describes how to setup an on-premise license server (or LLS, for local license server) in case that using the more comfortable cloud licensing system is prohibited by your company's policies and/or technical restrictions.
With version 4.0, the former product line of DESITE BIM has been unified into a single application named VDC Manager.
Older licenses for DESITE md, DESITE md pro and DESITE custom can still be used with VDC Manager.
For customers who have had past experience with Flexera licensing technology, a short note and clarification on terminology:
The LLS product's official name is "FlexNet Publisher" (or FNP in short), but you may know it under its former name "FlexLM" - common spelling variations are "Flexlm", "FLEXlm", and possibly some others.
This guide will refer to it just as "the license server" in an attempt to avoid confusion.
The setup can be roughly divided into 3 phases:
- Get the licensing toolkit and identify the server machine.
- Generate the license file in the Thinkproject Licensing Customer Portal.
- Install the license server with the license file on the server machine.
- Get the licensing toolkit and identify the server machine
Go to the machine designated for running the license server and log in. You will probably need administrative privileges to make any changes.
Download the Thinkproject license server toolkit file and unzip the contents into a new directory. The files unzipped into the directory will be:
lmgrd.exe - the license server
lmhostid.exe - a host ID utility (command line)
lmtools.exe - management utilities (GUI)
thinkprj.exe - thinkproject's vendor daemon
Make sure you have the current version of the toolkit, 11.19.5.0.
This or a newer version will be mandatory starting with VDC Manager 4.0. Older versions of DESITE will be compatible with this LLS as well.
Run lmhostid.exe to determine the MAC address of your server machine that the license will be bound to. You should see something like this:

Please copy out the host ID that the tool retrieved. You will need it in the license generation process.
Note: The tool may return multiple IDs (separated by spaces) if your machine has more than one ethernet adapter. In such a case, please just pick one.
- Generate the license file in the Thinkproject Licensing Customer Portal
Go to the Thinkproject Licensing Customer Portal and log in using your email and password.
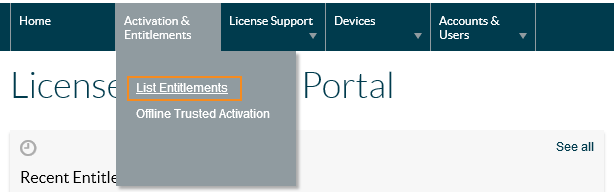
Go to "Activation & Entitlements" -> "List Entitlements"
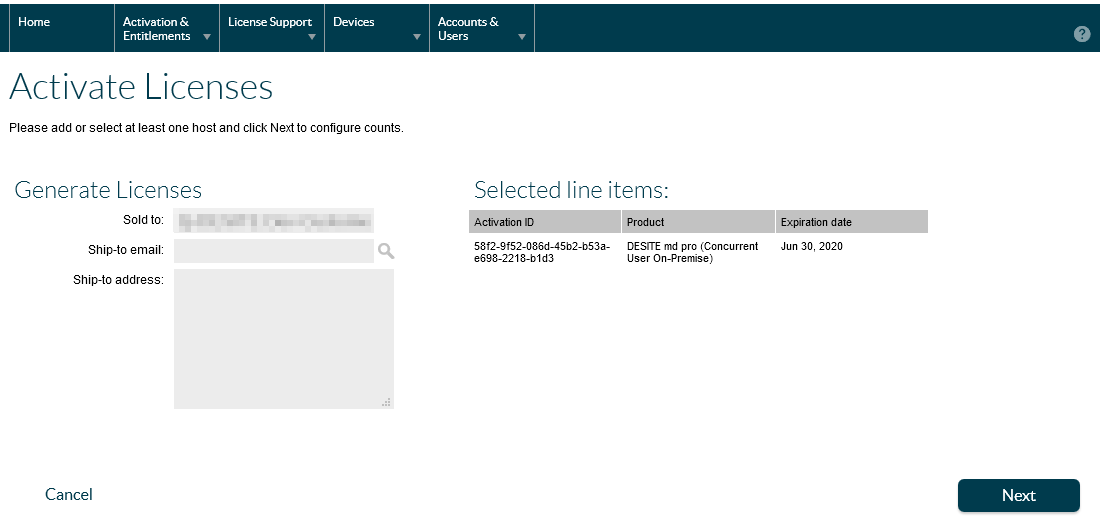
In the list that comes up, please tick the checkbox in front of the license that you wish to activate.
Then, please choose "Action" -> "activate"

You should now be seeing a screen similar to the one below. Please click "Next".
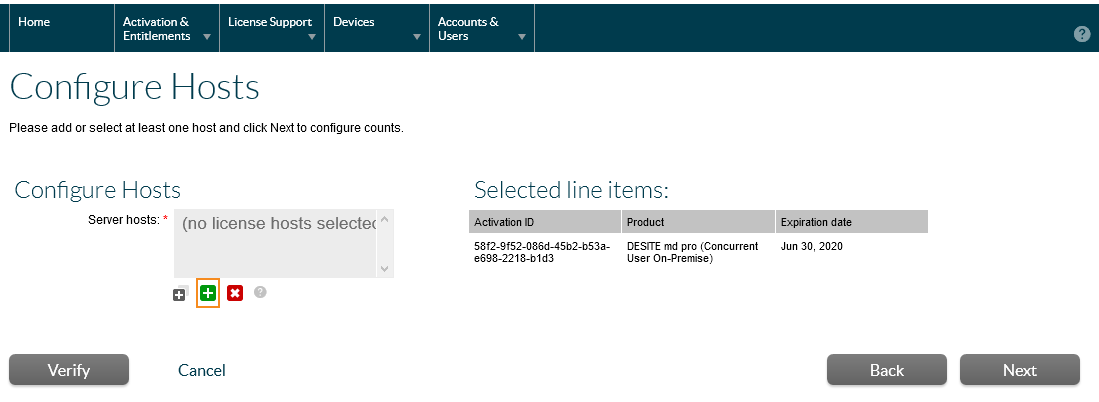
On the upcoming screen, you must configure the license server host. Please click the green + sign to do so.
From the "Server Hosts" drop-down, please select "ETHERNET".
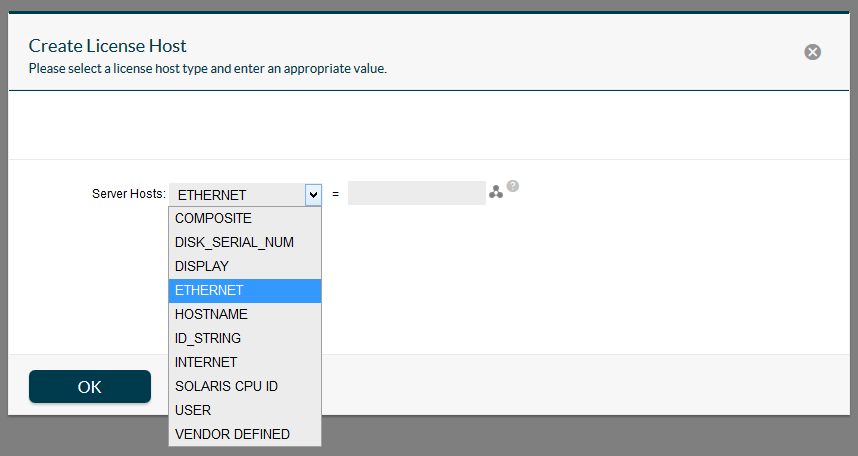
Enter the host ID determined in phase 1 (lmhostid).
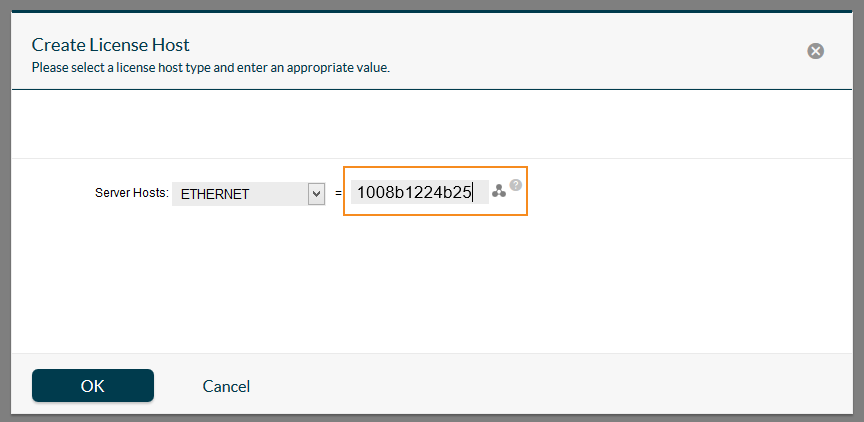
Click "OK", then "Next".
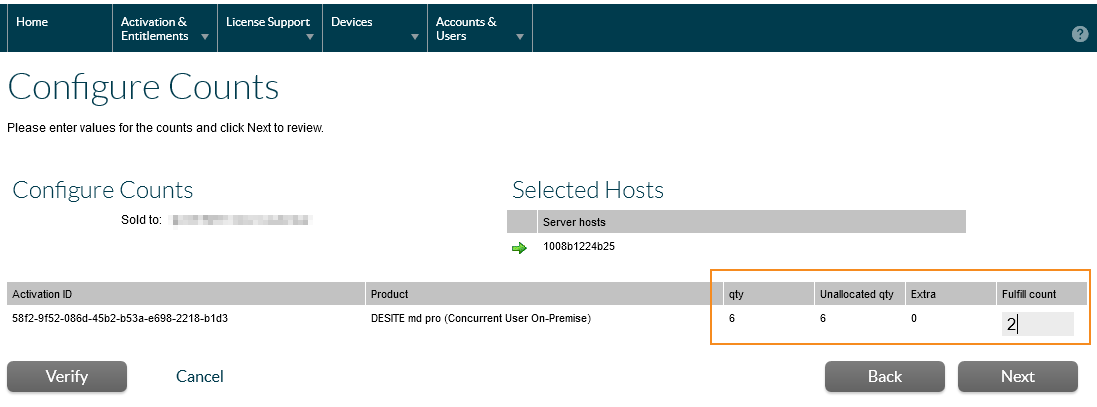
On the next screen, you need to enter the fulfill count, which is the number of licenses that the specified host will manage and distribute.
You can use a lower amount than the total quantity, e.g. when you want to split the available licenses over various license servers. In the example picture below, the fulfill count is 2 out of 6.
The most common scenario, though, is putting all licenses on one server. In that case, set fulfill count to the full quanity, which you see in column qty.
Accept the setting by clicking "Next".
License generation is about to be completed. You should now be seeing a screen like shown below, where you can once again review all the settings you made:
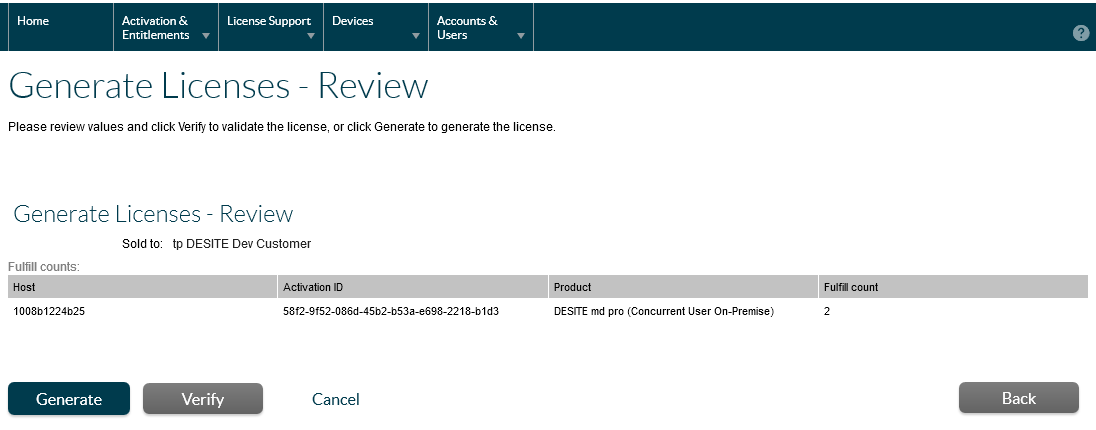
If you want to change any of the settings, click "Back".
To have the licensing system check your settings for completeness and consistency, you can (optionally) click "Verify". The result should look like this:

Finally, click "Generate".
You will be presented with a final summary, similar to the one below. Click "Complete".

The license has been generated, now what is left to do is downloading the actual license file to deploy to your server.
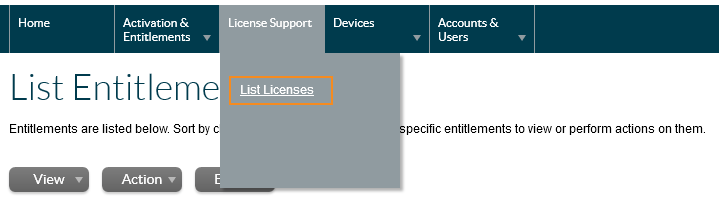
Go to "License Support" -> "List Licenses".
Mark the checkbox in front of the license we just created.
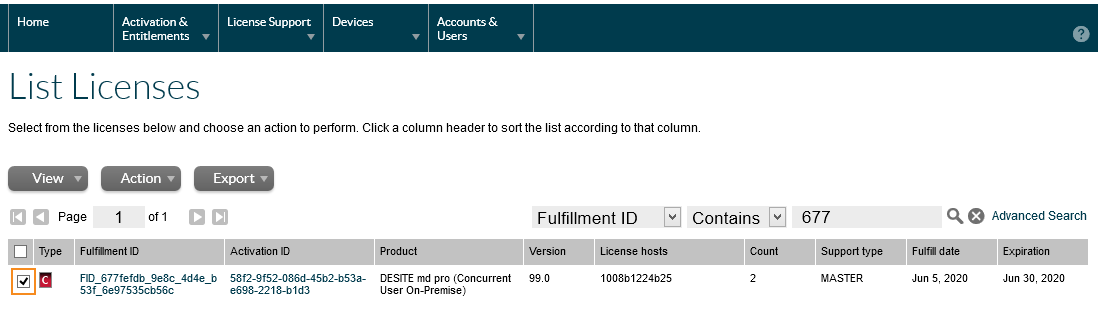
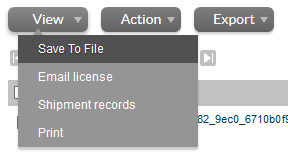
Choose "View" -> "Save to file".
You can choose a location and a file name at will. For convenience, it makes sense to put the file into the same folder as the one containing the license server toolkit (See phase 1).
For this tutorial, the file will be named "tpLicenseFile.lic".
- Install the license server with the license file on the server machine
Note: You must make sure that your server system's firewall does not block the license server's communication. The easiest way to do that is to configure firewall exceptions (both outgoing and incoming) for lmgrd.exe.
There is also the possibility to configure the license server to use specific ports and then opening just those ports in the firewall. This approach is covered by a separate documentation, but it is recommended to finish the basic setup first.
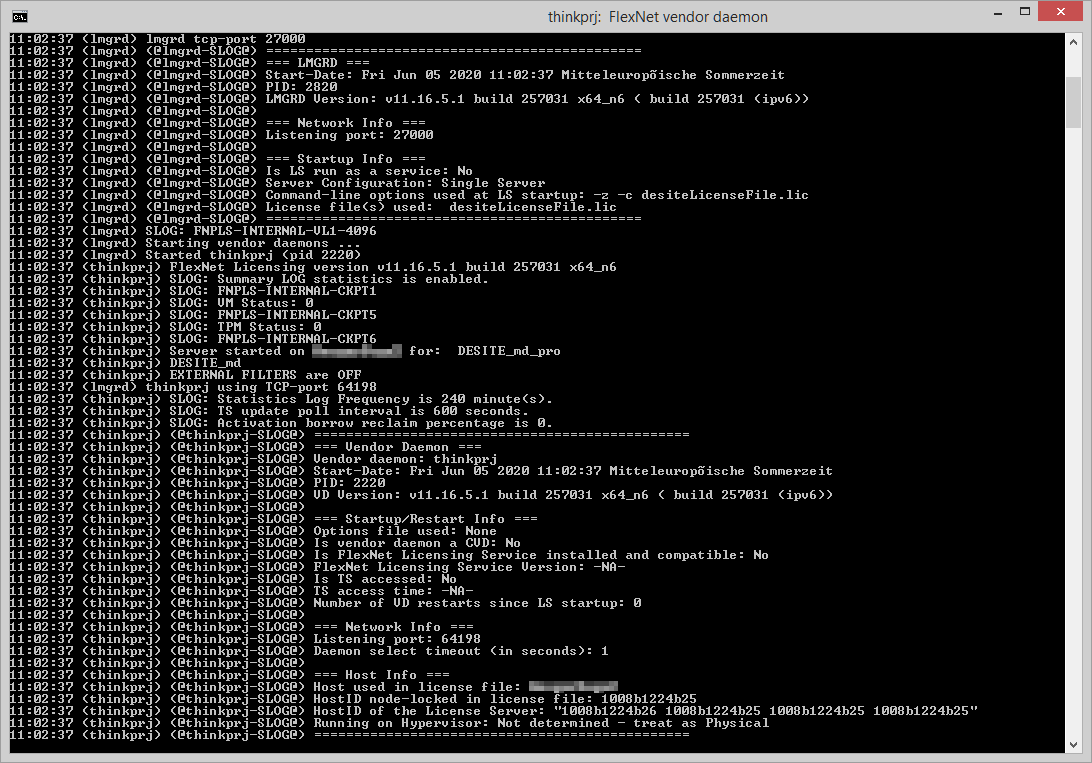
From the directory on the server machine that holds the licensing toolkit (from phase 1) as well as the license file (from phase 2), run the following command:
lmgrd -z -c tpLicenseFile.lic
The result should look similar to this:
With the license server now up and running, try to check out a license in VDC Manager or DESITE running on a client machine.
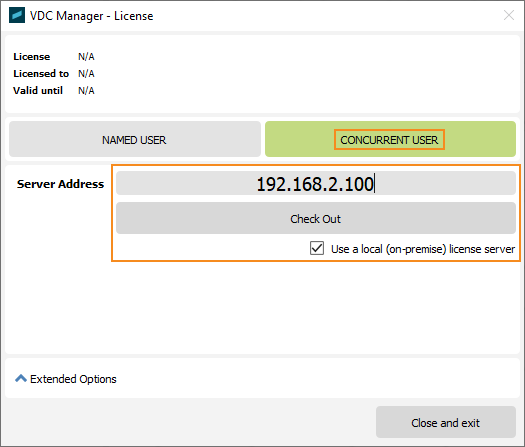
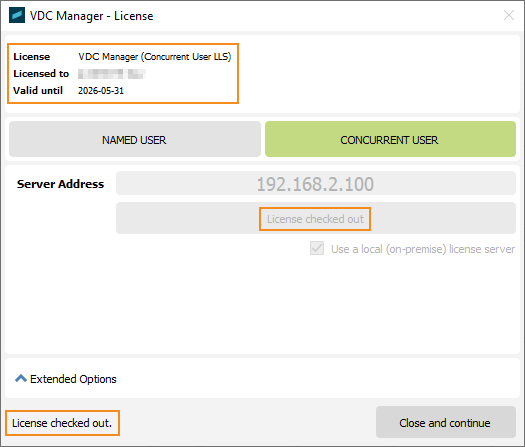
In the license dialog, switch to the "Concurrent User" tab and make sure that the "Use a local (on-premise) license server" checkbox is ticked.
As "Server Address", enter the network address of your license server machine.
Click "Check Out".
With everything working correctly, you should get a "License checked out" response.
Having a look at the license server again, lmgrd should have printed additional lines such as the following:
(thinkprj) OUT: "VDC_Manager" yourUser@yourMachine
(Obviously, this will differ depending on the product being licensed. You may also see "DESITE_md", "DESITE_md_pro", "DESITE_custom", etc.)
With the license server running, we could wrap it up here. However, what you probably want to do is to set up lmgrd as a Windows service to automatically start up each time the machine is rebooted.
There are several ways how you can set this up; the following steps describe how to do it with the help of lmtools.exe, which comes with the thinkproject license server toolkit.
Shut down the license server that you have started manually in 3.1, and open up lmtools.exe.
Switch to the tab "Config Services".
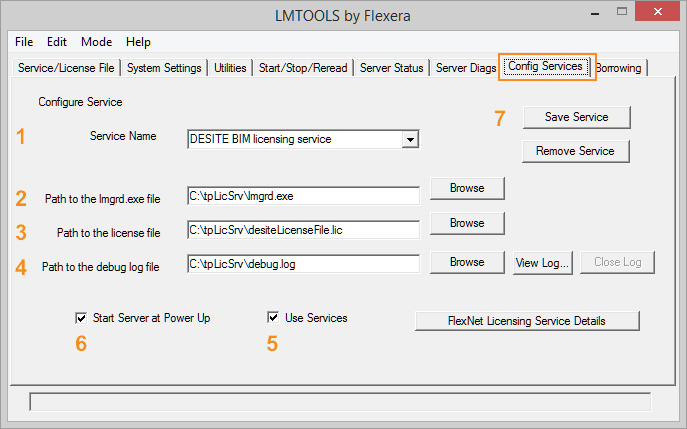
Assign a name to the service: in this example we call it "VDC Manager licensing service". You can choose any name you like. It is, however, advised to choose a name that will help you find the service in the list of all Windows services as well as distinguish between different Flexera services, in case you are running more than one.
Type or use the browse button to define the location of the license server program, lmgrd.exe. In this example, we use a directory called C:\tpLicSrv.
Type or use the browse button to define the location and name of the license file. In this example, it is C:\tpLicSrv\tpLicenseFile.lic.
Type or use the browse button to define the location and name of the log file. This file can be useful if problems arise. It does not have to be in the same location as the licensing toolkit, nonetheless, we are using it again here to keep things simple: C:\tpLicSrv\debug.log.
Note that writing permissions to this directory are required.
Check the box labeled "Use Services". This will install it as a Windows service.
Check the box labeled "Start Server at Power Up". Windows will start the service automatically each time the computer is rebooted.
Click on "Save Service".
At his point you have configured the license server as a Windows service, however, it has not been started yet.
Switch to tab "Start/Stop/Reread", select the service we just configured, and press "Start Server".
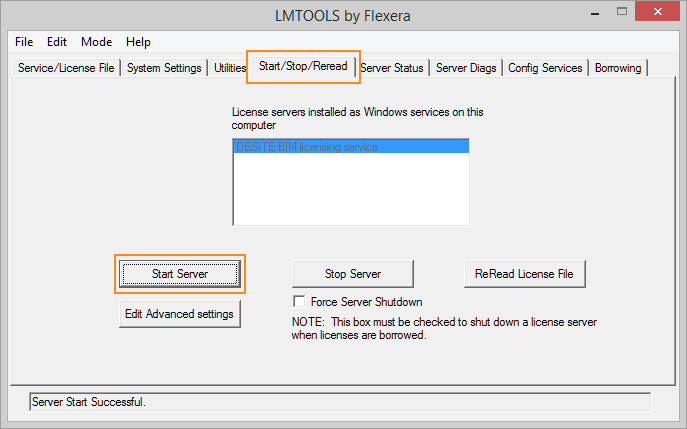
You should see the message "Server Start Successful."